So far, we have an Arduino-driven thermal printer that can connect to exciting.io's server, and a Twitter bot that's busily producing tweets on a regular basis. Now, though, we've got to get them to talk to each other. This used to be rather simpler (there are several tutorials for getting Arduino to talk directly to Twitter), but Twitter changed its security protocols a while back, and so we have to come up with some workarounds.
This method takes advantage of a built-in function of exciting.io's backend server: if you give it a URL on the web, it will format the data and send it to the printer. So, we're going to make a "feeder" web page that displays one tweet, and then send that data to exciting.io..
Here's the basic method:
Twitter now uses an authorization system called OAuth. We're going to use a PHP script that makes use of the TwitterOAuth library to connect to Twitter, retrieves the latest tweet, and then creates a very simple web page (you can see MashBOT's page working here: http://helenburgess.com/mashbot/feeder.php)
Then, we're going to use a simple cron script that sends the data from the feeder web page to the Exciting.io backend server.
Step 1: Make an App
Yes, I know you made a Twitter app to write tweets in the previous tutorial. That App was set up to get data IN from an outside source (the spreadsheet or Python scripts that generate text). Now, you're going to make second one to get data OUT of Twitter and send it to the feeder page.
You should be a Twitter pro by now, so go to apps.twitter.com, create a new app, and make a note of the four security keys you need.
Create a new folder called whatever you want (e.g. "feeder" - no spaces!!).
Now, download a copy of Andrew Biggart's scripts to get data. You can find them here. Put those inside your feeder directory.
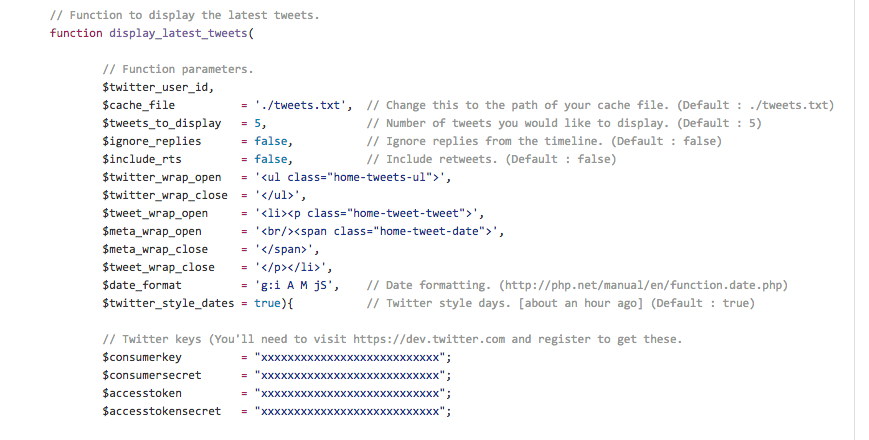
From here, there's only some minor setup if you want the page to just print the tweet with no formatting. Inside the tweets.php script, enter your four access keys and tokens where it asks for them. There are also some other options if you want them:
I suggest setting the cache file to "tweets.txt" (since it's in the same folder), and changing the $tweets-to-display option to 1.
Scroll down to the bottom of the script, enter your twitter username (e.g. @mashomatic), save the file, and you should be good to go.
Upload the entire feeder folder (or whatever you've called it) and then, on the Web, navigate to tweets.php (e.g. http://yourdomainname.com/feeder/tweets.php) to make sure it displays tweets.
Customization
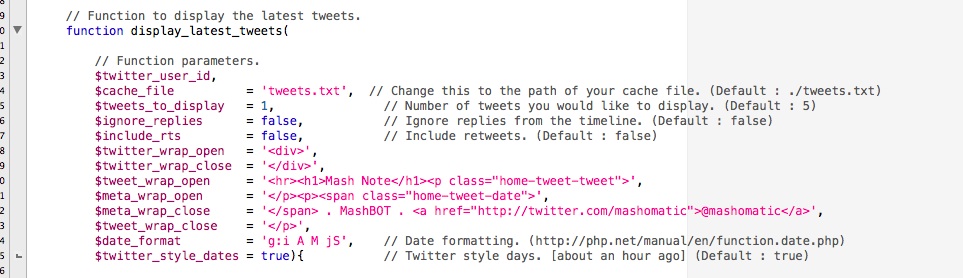
For mashbot, I've done some alterations so that it outputs tweets with some basic formatting for the printer. Specifically, I've changed some of the HTML tags to create a header and some other info:
And finally, I've wrapped the whole PHP script inside some HTML from exciting.io so that it displays the way I want it:
All we need to do now is send data from the feeder page to exciting.io's server. This can be done with a simple command in your local terminal:
curl --request POST 'http://printer.exciting.io/print/yourprinteridnumber?url=http://path.to.your.feeder/tweets.php'
Replace "yourprinteridnumber" with the id number you got when you tested your printer at exciting.io, and the URL with the address of your feeder script. Mine looks like this:
curl --request POST 'http://printer.exciting.io/print/xxxxxxxxx?url=http://helenburgess.com/mashbot/feeder/tweets.php'
This will send the tweet to the printer, and you should see the yellow light flash, followed by green. Press the button and bam! there it is.
The Very Very Very Last Step
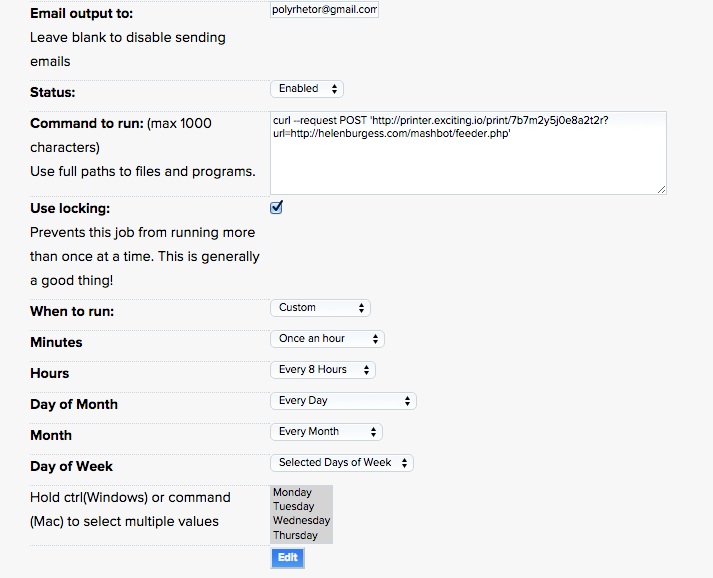
Obviously you don't want to have to type that command every time you want to print a tweet, so you can set up a cron job to do it, and tell it how many times an hour/day/etc you want it to run. (If you've never used cron, you can find out more here: https://en.wikipedia.org/wiki/Cron). You can follow those instructions to set it up by hand on your server, but I run my cron job via my host, Dreamhost, which has a fillable form to set it up. Mine looks like this, set to post once every 8 hours:
If your host uses CPanel, there's also a cron setup page. There are also other online services which will run it for you, in case your host doesn't allow cron jobs.
 Instruction Set: Feeding from Twitter to Printer